Pages

Sunday, September 20, 2015

How to open Internet Explorer in Windows 10

Microsoft Edge is the default browser in Windows 10. But if you prefer to use IE, then this post will show you how to open Internet Explorer in Windows 10 and how you can pin it to your Start Menu or Taskbar for easy access and how you can even set it as your


Open Internet Explorer in Windows 10


In the Windows 10 taskbar search, type Internet Explorer and you will see it appear in the results.

Clicking on it will open Microsoft Internet Explorer.


Pin IE icon to Windows 10 Start or Taskbar

Right-click on the Start search result and select Pin to Start or Pin to taskbar, according to your preference. The IE icon will get pinned.


Set IE as default browser in Windows 10


If you use it frequently, you can set it as your default browser via Internet Options > Programs tab > Internet programs > Set programs. Control Panel will open. You can set Internet Explorer as the default browser under Set your Default Programs applet.


This is how you can open Internet Explorer 11 in Windows 10, and how you can pin it to your Start Menu or Taskbar for quick frequent access and set it as your default browser.


In the Windows 10 taskbar search, type Internet Explorer and you will see it appear in the results.

Clicking on it will open Microsoft Internet Explorer.


Remove or Turn System Icons like Clock On or Off in Windows 10 Taskbar

Windows 10 OS is different from its earlier versions, but retains some of the old features. For instance, Windows 10 displays a clock icon in desktop taskbar. The icon resides in the lower-right corner of the screen. The option proves handy for knowing current date and time however, some users find it of little use. As such they prefer removing it from the taskbar properties. This guide will walk you through the process of removing the clock from Windows 10 Taskbar.


Remove Clock from Windows 10 Taskbar


For removing the Windows 10 desktop taskbar clock, you’ll have to make some changes in the Notifications & Actions section of the Windows 10 Settings app. To do so, move the mouse cursor to the lower right corner of your computer screen, right-click on the clock and select Customize notification icons as shown in the screenshot below.


Turn System Icons On or Off in Windows 10


Instantly, Quick Actions screen will be launched. The section primarily displays the apps that appear under the taskbar settings. In the right pane look for the option with the heading ‘Turn System Icons On or Off‘. Click this option and proceed to the next step.
the screenshot below.


Here, you will find, most of the icons are set “On” by default, with some exceptions depending on your configuration. ignoring these options, look for the clock option and to remove the clock from the Windows 10 taskbar, simply set the Clock entry to Off.

Friday, July 31, 2015

Fixing Windows 7: Prevent Windows Waking from Sleep


If you’re trying to save a few bucks on power, setting your computer go to sleep after some time of inactivity in power settings is a good solution. However, devices that are connected can cause the computer to wake up. For instance, a slight movement of the keyboard or mouse can wake it up.

It’s also quite annoying when you put your computer to sleep before bed, and when you wake up, it turns out the system was running all night. Here’s how to fix the problem of your computer waking up.
Disable Mouse or Keyboard from Waking Windows

It’s easy to prevent mouse movement to not wake up you computer in either Windows 7 or 8.1. From the desktop open Control Panel and click on Mouse


Or in Windows 7 click the Start button and type: mouse and hit Enter.


In the windows that comes up, select the Hardware tab and click Properties.


Next click the Change Settings button under the General tab.


In the next screen under the Power Management tab, uncheck Allow this Device to Wake the Computer and click OK


The process is the same for the Keyboard as well. Select Keyboard from Control Panel and follow the same path to Power Management and uncheck Allow this Device to Wake the Computer and click OK


Other Devices and Network Activity that Wake Windows from Sleep

While it’s usually the mouse or keyboard that wakes up your computer, other hardware can cause your computer from waking as well. To find out what is waking it up, you can use a couple of handy commands.

powercfg –lastwake


If that doesn’t work, here’s a more powerful command you can use. This will list every hardware device that has permission to wake your computer.

powercfg –devicequery wake_armed


It’s also worth noting that network activity can wake you computer up too. med


Monday, June 15, 2015

How To Disable the Windows Startup Splash Screen

If you’re tired of seeing the Windows 7 logo splash screen every time you restart your system, it’s easy to disable it. Here’s how.


In Windows 7 or Vista, click Start and type: msconfig into the search field and hit Enter


The System Configuration windows opens. Select the Boot tab, then check No GUI Boot. Click OK


The next time you restart your system, the Windows splash screen will no longer be displayed, and you’ll go directly to the log in screen. It’s debatable whether this helps Windows boot faster, but at least the annoying screen is gone.


You can use this trick in XP and Vista too. In XP, open msconfig, click the BOOT.INI tab and check /NOGUIBOOT, click OK and restart the system


If you’re sick of hearing the Windows start up sound, you can disable that too.


Saturday, May 2, 2015

How to enable Spelling check in Google Chrome


Correct spellings are very important specially while filling online forms. Google Chrome users can enable automatic spell checker for fixing incorrect spellings quickly. Once Google Chrome’s spellings check feature is activated, it will highlight wrong spellings which can be corrected in few simple clicks. Besides standard spell check, you can also enable ‘better’ spell check in the form of “Ask Google for Suggestions


Turn On Spellings check feature in Google Chrome


1. In Google Chrome browser, click on icon at top right and then goto “Settings” option. Scroll down to bottom of Google Chrome’s Settings page. Then click on “Show Advanced Settings” option.


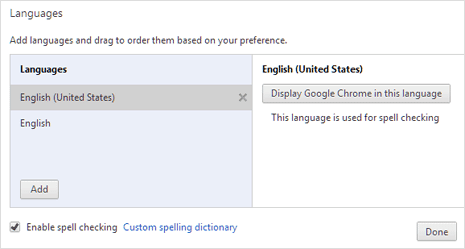
2. Now scroll to “Languages” section. Here click on “Language and Input Settings” option to open a pop-up box. Click on “Enable spell checking” option at bottom left part to activate automatic spell check feature in Chrome browser


3. You can also add custom words to spell checking dictionary in Chrome browser on your computer. Just click on “Custom Spelling Dictionary” and then add custom words to be marked as correct spelling by Chrome’s Spell checker


Enable better “Ask Google for Suggestions” spell check


1. For more accurate and better spell checking experience, you can enable “Ask Google for Suggestions“. When enabled, spellings in the form field are sent to Google servers for spell check. So in this process you are using same spell checker as used on Google Search.


2. To enable this, open any form like here and then right click on the text field. Goto “Spell-Checker options” and then click on “Ask Google for Suggestions“. You should see small floating box which reads:


“Google Chrome can provide smarter spell checking by sending what you type in the browser to Google servers, allowing you to use the small spell checking technology used by Google Search.”


3. Click Enable button to activate  “Ask Google for Suggestions” option for better spellings check in Google Chrome. With these options activated, there will be no more wrong spellings while entering data in online forms within Google Chrome browser.


Saturday, April 18, 2015

Windows 8 – Add or Remove Lock from the User Tile Menu

The new Windows 8 start screen has been fascinating many users out there. As we all are aware that Windows 8 has been developed for both Windows 8 PC and Smartphone’s. The start screen is an assembly of various applications all under the same screen. Windows 8 includes lock screen which locks your screen to prevent access of your account when you are not around your system. You can see the screen lock upon clicking the Username and then click on LOCK. Here is the tutorial how you can add or remove Lock from User Time in Windows 8.


The new OS brings out features that are never seen before comparing with the earlier version of Windows OS. The lock screen maintains privacy on your system.

The lock feature can be turned ON or OFF depending on your preferences or requirements. The tutorial here will show you how to add or Remove Lock from User Time in Windows 8.


How to Add or Remove Lock from the User Tile Menu in Windows 8

Follow the steps given below to add or remove lock from user tile menu in Windows 8

First hold down Windows key + X and then hit P to open Control panel
Next, click on System and Security
Now click on Power Options
In the power options window, click on Choose what the power button does link


Next, click on Change settings that are currently unavailable to activate the items that are grayed out


If you want to add Lock from the User Tile Menu, check the box beside Lock in the window


 In order to remove Lock from User Tile Menu uncheck the box.
Upon completion of all the steps described you can find that the lock is added or removed as per your set preference.
The tutorial here will show you how you can add or remove Lock from the User Tile Menu in Windows 8.


How to boot win 8 fast

Startup programs are that applications that gets started as soon as you login your system. Among all the startup programs some are essential at startup but excess of programs at start up can delay Windows startup. As all the startup programs require some time to be triggered. But one day all of a sudden you find that the startup programs are not started or say the programs that are supposed to startup at boot are not started. To fix this issue we have come up with some possible fixes to resolve this issue on Windows 8


Startup programs are abruptly stops functioning or running at startup can prevent Windows boot. When you find that the startup programs are not starting at boot, try out the simple troubleshooting steps described below to resolve this issue on Windows 8.

Firstly check the system configuration and verify that the startup programs are not disabled. If so, then enable them. You or other user on the system might have disabled this program but you might have forgotten this. So, open system configuration and go to startup tan and enable all the startup programs.
started or say the programs that are supposed to startup at boot are not started. To fix this issue we have come up with some possible fixes to resolve this issue on Windows 8


You can also go for Windows 8 Refresh. This will uninstall all the non-Microsoft programs and help fixing many issues on the system. This doesn’t remove or delete you personal files or say all your data and information files are kept intact. You can later re-install the non-Microsoft programs


For faster startup Windows 8 includes fast startup or Hybrid Shutdown. But this hybrid shutdown can also be the culprit for not starting the startup programs. Disable the fast startup option and see if this helps you to get rid of this problem.


To disable Hybrid Shutdown or fast startup, follow the steps given below


Open power options from control panel or taskbar

Next, click on the link Change what the power buttons do in the left pane

A new window opens, here scroll down and uncheck the option Turn on fast startup (recommended) under Shutdown settings.


Once all the steps described above are completed, you can see all the startup programs running at boot.

Upon following the steps described above in this tutorial you can easily resolve issues with programs not starting at Windows startup or Boot