Pages

Saturday, September 17, 2016

Choose Which Icons Appear in System Tray in windows 10


It’s simple to pin specific items to the Taskbar that you want quick access to. In fact, this is one of the handier options because it allows simple access to the apps you use the most often.

However, what about the Notification area (the section at the right side next to the clock)? You can control what shows up there, too. Here’s a look at how to do it.


Choose System Icons in Windows 10

First, go to Settings > Personalization > Taskbar. Then scroll down, and under the Notification area section and select Turn system icons on or off.


Then on the next screen is where you can turn system icons on or off, including Action Center (which some people have no use for).


What is your opinion of removing some of the system icons from the Taskbar? Do you turn some of them off? Leave a comment and tell us your thoughts

How to Manage and Disable AutoPlay in Windows 10


AutoPlay is a Windows feature that Microsoft first introduced way back in Windows 98. AutoPlay detects when removable devices such as DVDs, flash drives, and camera memory cards are connected, and automatically launches a designated program to play or view any compatible content those devices contain. For example, if you insert a DVD movie into your AutoPlay-capable Windows PC, the DVD player app will launch and start playing the movie.


AutoPlay can be a useful feature in that it makes it quicker to access your content with common apps. But it can also become annoying for some users who prefer to access their content manually or with different applications. AutoPlay is enabled by default in Windows 10. If you find the feature to be more annoying than helpful, here’s how to disable it.


Disable AutoPlay

To disable AutoPlay in Windows 10, head to Start > Settings > Devices > AutoPlay.


Users have the option to disable AutoPlay completely by turning it off with the first setting: Use AutoPlay for all media and devices. AutoPlay will be disabled as soon as you toggle the option to the Off setting. There’s no need to reboot or save your change.

Manage AutoPlay Settings

Instead of simply disabling AutoPlay, you can manage how it works for certain devices. To do so, first leave the main AutoPlay toggle described above set to the On position. Next, look at the options under Choose AutoPlay Defaults.

Your own Settings window will look a bit different from the one in our screenshots as each PC is unique. In general, you’ll see an option for
Removable drives,” which covers devices like USB flash drives, and “Memory cards,” which refers to your digital camera’s SD or Compact Flash cards. You’ll also see specific references to certain other devices such as external hard drives or, in the case of our screenshot, mobile devices like the iPhone.


You can click on the drop-down menu beneath each device type to set a default AutoPlay action.  You can also disable AutoPlay for that device by choosing Take no action.
For example, in our screenshots above we’ve disabled AutoPlay for Removable Devices and Memory Cards (“Take no action”), but we’ve configured AutoPlay to launch File Explorer and show our photos each time we connect our iPhone. If you frequently open the same type of content in different applications and would like to be prompted each time a device is connected, choose Ask me every time. Also note that you can trigger the “Ask Me” prompt regardless of default setting by pressing and holding the Shift key on your keyboard while you connect an AutoPlay-compatible device.

Changing Advanced AutoPlay Settings via Control Panel

The AutoPlay options in the Windows 10 Settings app are relatively straightforward. Longtime Windows users, however, may notice that these default options aren’t as granular as those found in previous versions. Thankfully, those old advanced AutoPlay settings are still available in the Control Panel.


Just head to Control Panel > Hardware and Sound > AutoPlay. Here, you’ll be able to choose default AutoPlay actions for all device types, including CDs, Blu-rays, and DVDs.


If you’ve made too many changes and want to revert back to the default AutoPlay settings, scroll to the bottom of the AutoPlay window in Control Panel and click Reset all defaults.

Thursday, September 15, 2016

How to Use the Windows 10 Full Screen Start Menu


Windows 10 reintroduced the Start Menu following the controversial use of the Start Screen in Windows 10. The Windows 10 Start Menu attempts to merge the best of the classic Start Menu and Windows 8’s Live Tiles, and many users were happy to see its return. But some users actually prefered the full screen Start Screen interface. In addition to personal taste, the full screen Start Screen is often easier to use on a touch-based device. Thankfully, Microsoft still allows users to access a Windows 8-style Start Screen. Here’s how to switch between the default Windows 10 Start Menu and the full screen Start experience.


From your Windows 10 desktop, click Start and choose Settings > Personalization


In the Personalization Settings window, click Start in the list on the left. Next, on the right side of the window, find Use Start full screen.


Enable the Use Start full screen option and close Settings. There’s no need to reboot or log off to save your change. Finally, just click the Start Button or tap the Windows Key on your keyboard. Instead of launching the default Start Menu in the lower-left corner of your screen, the Start Menu will expand to cover the entire screen


As mentioned, the full screen Start Menu is often easier to use with a touch screen. It also gives you more room for live tile icons and other pinned Start Menu applications. While in full screen, you can access the standard Start Menu functions by clicking or tapping on the three horizontal lines at the top right. The “All Apps” list is also available via the Apps icon on the bottom right


If you don’t like the full screen Start Menu, just head back to Settings
> Personalization > Startand uncheck the option. This will revert you to the default Start Menu. As mentioned, a reboot is not necessary when changing between the default and full screen Start Menu, so feel free to experiment with both options.
 

Windows 10: Increase Taskbar Transparency via the Registry


We’ve previously discussed the personalization options in Windows 10 that allow users with compatible hardware to enable or disable a slight transparency effect for certain elements of the user interface. Even with Windows 10 transparency enabled, however, the effect on the desktop taskbar is minimal at best, with very little translucency to reveal the user’s wallpaper or apps positioned beneath it. Luckily, there is a hidden option in Windows 10 to increase the translucency of the taskbar, and here’s how it works.


Enabling the hidden option for increased translucency of the Windows 10 taskbar requires editing the Windows Registry, a crucial database which keeps track of low-level configuration options for Windows and many software applications. Therefore, exercise caution while navigating and editing the registry, and always make sure you have a current backup of all important data on your PC, as certain changes to the Registry can cause system crashes and data loss.
All of that said, you can launch the Windows Registry by clicking on Start and typing Regedit. The Registry Editor will appear in the list of results; click on it to launch the utility.


From the Windows Registry Editor, use the hierarchical list on the left side of the window to navigate to:


HKEY_LOCAL_MACHINE\SOFTWARE\Microsoft\Windows\CurrentVersion\Explorer\Advanced


Once you’ve selected the “Advanced” key on the left of the window, right-click in an empty portion of the right side of the window and select New > DWORD (32-bit) value and name it: UseOLEDTaskbarTransparency.


Next, double-click on your new DWORD value and, in the box that appears, set its Value Data field to the number one (“1”). Click OK to close the value editor and then quit the Registry Editor.
Return to your Windows 10 desktop, right-click on an empty space and select Personalize. Alternatively, you can click Start > Settings > Personalization. From the Personalization section of Settings, click Colors.


Finally, from the Colors window, enable Make Start, taskbar, and action center transparent. If this option was already enabled, then quickly toggle it by disabling and re-enabling it in order for the change to take effect.


The result of the increased taskbar transparency will vary depending on your accent color choice and desktop wallpaper image, but you should see a small but noticeable decrease in opacity, removing a potential visual distraction for some users and allowing you to more clearly enjoy your desktop wallpaper image from edge to edge of your display.
If you don’t like this new “high transparency” look, just head back to the same Registry Editor location identified above, double-click on the UseOLEDTaskbarTransparency entry, and change the “1” (one) back to the default “0” (zero). Once you head back to Start > Settings > Personalizationand toggle the ‘Make Start, taskbar, and action center transparent” option again, your Windows 10 taskbar will return to its default level of translucency.


Make the Taskbar Completely Transparent


The steps above involve using built-in Windows settings to increase the translucency of the taskbar, but if you want more control over the exact level of translucency, or if you’d like to make the taskbar completely transparent, you can turn to a free third party tool called Classic Shell.
Update [August 3, 2016]: The Classic Shell installer has reportedly been compromised and is currently not safe to install. We have therefore removed the link to the Classic Shell website until we can confirm that the security vulnerability has been addressed


Classic Shell is a great utility with hundreds of useful options for customizing the look and feel of Windows, but one of its options is the ability to not only switch between a transparent and opaque taskbar, but to set the exact percent of transparency for the taskbar as well. Just download and install Classic Shell using the link provided earlier, launch the included Classic Start Menu module, and click on the Windows 10 Settings tab.


Here, you’ll see several options for enabling or disabling taskbar transparency altogether, setting a custom color value, and, most importantly for our purposes, a percentage value for Taskbar Opacity. To change this value, first check the box labeled Customize Taskbar and then choose Transparent.


Next, set the value in the Taskbar Opacity box to between 0 and 100, with 0 representing a completely transparent taskbar and 100 representing a completely opaque taskbar. Once you’ve made your change, click OK and you’ll see your taskbar transparency change immediately. In the example screenshot above, we set the opacity value to zero, resulting in a completely transparent taskbar.
 

Tuesday, September 13, 2016

Create PDFs in almost any program in Windows 10


Converting documents, maps and other content to PDF files can make it easier to share them over email. Until now, you had to install a third-party PDF tool to carry out these conversions, but many, such as CutePDF, come crammed with adware, toolbars and other unwanted junk.
Sensibly, Microsoft has built PDF creation into Windows 10. Better still, the feature has been incorporated as a print option, meaning that any program or app that allows you to print will also allow you to create or convert your files to PDF.


Let's say you want to save a web page as a PDF. Simply click your browser's menu button (usually in the top-right corner) and select Print. Then choose 'Microsoft Print to PDF' from the list of available printers. Change any other settings as needed, then click Print. You'll be prompted to give your PDF file a name and choose a location to save it in. Do so and your PDF will be created.

Set default save locations for specific file types In windows 10 OS


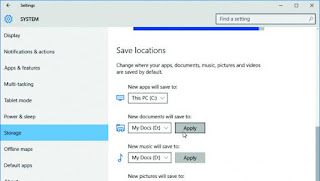
In Windows 10, you just click an option to set which drive you want to save each type of file to. You might want to do this if your PC uses a fast SSD for its system drive and a larger traditional hard drive for storing files.


Click Start, Settings, System, then Storage. Scroll down to the 'Save locations' section, use the dropdown menus to select the drive you want for each type of file, then click Apply. Note that this won't move any existing files to the new locations - you'll still need to move these manually.