Pages

Wednesday, December 26, 2012

Airbag For Mobilephones

Airbag For Mobilephones


 We've all either done it or had nightmares about it: dropping an expensive mobile device. Well, Amazon CEO Jeff Bezos thinks he has the solution--mobile phone airbags.

“While the size and weight of portable devices make them convenient to carry around, these characteristics often make them more susceptible to damage and loss,” the application explains. “With the number of cellular phones in use exceeding several billion and repairs typically exceeding Rs1800, the costs of damage and loss of cellular phones amounts to billions of Rupees  per year.”


The technology would deploy the airbags in such as way so that the impact would be absorbed by the airbag first. This would cushion the blow and make the difference between a shattered screen and a device with a few nicks and scrapes


It might not be an airbag that saves your phone: Bezos’ idea says springs could be used instead, or maybe an expulsion of air (is your device going to land like a spaceship?), or maybe even a combination of these ideas. Kind of out there, but certainly an interesting concept


Amazon is now came up with a new air bag technology, same as like the air bag system in automotive. Air bag can protect the phone from serious damages while falling down. This technology is not only going to apply with mobile phones but with cameras, tablets etc


Amazon got approved their patent for applying their new air bag technology with mobile phones, tablets and cameras. The technology uses device's gyroscope, camera, or other sensors to determine if the device its moving quickly toward the ground


Saturday, December 22, 2012

Hide Your Partitions


Hide Your Partitions

Hide Your Partitions ( C , D , E , F) for any 5 th and 6 th also


This trick is for all those guys whose wants to tons of data into their disks,We want to store some personal files or data which we don't to show anyone or access it This trick is for all those guys!!


Click start button>run type gpedit.msc,


now move to user configuration >administrative templates windows components > windows explorer,
press

double click on "Hide these specified drives in My Computer" after following This steps properly You'll find another option "Prevent access to drives from My Computer" double click on dis option & change it accordingly

To make it normal again click on "disable" by double clicking on "Hide
these specified drives in My Computer" option ..


Tuesday, December 18, 2012


How to allow users to Run only specified programs in Windows  7


You can allow users to run only specified programs in Windows 7 operating systems. It is up to you if you want your shared computer to allow users to run only specified programs in Windows 7. A shared computer in an office, for example, can be set in the same way if the company does not want the employees to run all types of programs. You can allow the users to run only specified programs in Windows 7 by using the Local Group Policy. However, you cannot do this in the Home editions of Windows 7 as it does not provide the Local Group Policy Editor.


Click on the Start button.
Type “gpedit.msc” in the search box of the Start menu and press the Enter button on the keyboard.


Local Group Policy Editor will open. Scroll down to “User Configuration”, “Administrative Templates” and then “System” on the left hand side of the window pane.


On the right hand side of the window, under “Setting”, navigate and double-click on “Run only specified Windows applications”.


The Show Contents window pane will appear. Here you can type the applications you want to let the users run


Monday, December 17, 2012

Use VLC as Video Cutter


Use VLC as Video Cutter

The latest version of VLC media playerVLC 1.0 lets you cut videos and use it as a video cutter.There has been a lot of several cool features added to the latest version of VLC.If you haven’t downloaded the latest version yet,then download it 

from here.
How to Cut Videos Using VLC 1.0
Install the latest VLC player(1.0).
Open player and under option “View” select “advanced controls”.

Now you can see some extra icons available in your control panel.First button from left is the “RECORD” button.


Open the video file from DVD or hard drive and just click the record button to start cutting the video.Press it again to stop recording.


After you finished cutting the video clip from vlc,you can find those clip in your “Documents” folder named as VLC Record with the date and time.By this you could save your favorite video clips from right inside vlc player itself.The recorded clip will be saved as an MP4 file.v


Monday, December 3, 2012

How to block a website using windows hosts


You can redirect or block one or more web sites using the HOSTS file in Windows (and other operating systems). The HOSTS file is located in the folder %windir%\System32\drivers\etc in Windows XP, Vista and 7. It is basically a text file with two columns : the first column consists of a target IP address and the second column consists of the respective source site address. When you access a site listed in the second column, you are redirected to the respective site in the first column. The two columns should be separated atleast by a single space.

 Step 1
Open   my computer   ->  c drive  ->  windows -> System32 -> drivers ->  etc -> hosts
Open   Hosts  With  notepad  then edit it 


 Step2
This would open your hosts file in Windows' Notepad. Start editing at the end of the file : Press Enter to start a new line. Type 127.0.0.1. Press TAB key once. Then type the name of the site you want to block, in this case, gooogle.cn. You do not have to type the http:// or www. part of a web site. Then end result will look like this


Step3
Save the hosts file. Now when you type gooogle.cn in your browser, it will be redirected to 127.0.0.1 and is effectively blocked for all programs.


How to block a content or a website in a computer using Internet Explorer


The Internet Explorer web browser runs on all versions of the Microsoft Windows operating system. Internet Explorer allows users to restrict the websites the browser will display, so that children or library patrons are effectively prevented from visiting unsafe web sites. This restriction is accomplished by keeping a "black list" of forbidden sites. You can manage this list, and thus block certain webpages in Internet Explorer.

Step 1
Launch Internet Explorer by clicking "Start," then "Internet Explorer." Click on "Tools," then on "Internet options," then on "Content."

Step 2

Click on the tab labeled "Content," then on "Enable." Click on the options labled LANGUAGE ,NUDITY,SEX &VIOLENCE  rate the levels for each subject then click apply  ok

Step 3

Block a webpage by blacklisting it: click on "Approved sites," then enter the webpage's address under "Allow this website." Click on "Never," then on "OK." At this point, the web page is blocked and Internet Explorer will not render it.


Monday, November 26, 2012


How to enable auto reply in gmail ?
If you are Going on vacation? No access to the Internet? No problem! Use Gmail’s vacation responder to let people know you won’t be able to get back to them right away.
You can set up a vacation response in your Gmail settings that will automatically reply to anyone who emails you. While the vacation responder is enabled, Gmail will send a response to anyone who contacts you.* If that person contacts you again after four days and your vacation responder is still enabled, Gmail will send another vacation response to remind the person that you’re away from your email.

  1. Sign in to Gmail.
  2. Click the gear icon in the upper-right and select mail settings along the top of any Gmail page.
  3. From the General tab, select Vacation responder on in the Vacation responder: section.
  4. Enter the subject and body of your message in the Subject: and Message:fields.
    • If you’ve enabled a personalized signature in your settings, Gmail will automatically append it to the bottom of your vacation response.
  5. Check the box next to Only send a response to people in my Contacts if you don’t want everyone who emails you to know that you’re away from your mail.
  6. Click Save Changes.


Saturday, November 24, 2012

how to find full system information


Find your total system information with real-time processor and RAM usage

Want to know which is your mother board ? which processor is used in your system ? Sys Information is programmed to become a total system information provider, and also very fast and accurate software,Sys Information uses only little resources to retrieve system information compared to other system information providers. It also accurate in retrieving the information such as
  •       * Retrieves Total Information of Hardware such as motherboard
  •          CPU, BIOS, RAM.     
  •      * Retrieves Installed Software by using a smart retrieval method for
  •         fast and accurate information
  •        * Uninstall a software from Software Section
  •      * Fast and Accurate Retrieval of Information.
  •      * Retrieves information about Installed Hard disk using a Optimized
  •         method for fast retrieval
  •        * S.M.A.R.T gives sys information the current temperature of the hard disk

Smart Retrieval Method – It is a method used by Sys Information by retrieving information from WMI and display it. This method is used to retrieve the information more fast and accurately. The Software will not freeze while retrieving information.
Total Operating System information – The complete information about your operating System. This feature is minimized in some system information providers. But it is displayed fully in Sys Information.
Fast Information Retrieval – Sys Information uses optimized retrieval method to retrieve Information so it will be fast and accurate.
Automatic Updating Method – Sys information uses automatic updating method to display information so you don’t have to worry, sys information will show you the live information.
Easy to Use Interface – Interface is very easy to use and clear for viewing information more clearly.
Installation is very simple,just download and Double click on the exe file to install this softWare,after installing open it and wait a moment for system information gathering.

Thursday, November 22, 2012

Burn a CD on Windows XP without using software


Windows XP comes with a builtin CD-copy feature that not many people are aware of. Although almost everyone has his/her favorite CD-copy software to stick with, it is still good to know about this CDR feature from Windows XP. You will find it very useful when you come to another PC that doesn't have a CD-copy software, and you can't just install your favorite software to it. With this feature, you can write some data or MP3 files to a CD/DVD, or erase a re-writable CD/DVD.
If you're using a Re-Writable CD (CD-RW), make sure the disc is blank. You might need to erase (or "format") it before use. For information how to erase a CD-RW on Windows XP without using any other software, see this article.
Requirements: You need to enable the CD-R feature on Windows XP. If you haven't done so, see this article.

  1. Insert a Formated-ReWritable CD or a Recordable (CD-R) disc into the CD drive.
  2. From Desktop, double-click on "My Computer".
  3. Navigate to the files/folders you want to copy to CD. Select them and press "Ctrl-c" to copy.
  4. Browse back to the CD-ROM, and press "Ctrl-V" to paste. The files/folders will show up as temporary files/folders at this time.

5.       On the left panel, select "Write these files to CD".

6.       The window "CD Writing Wizard" appears with the default CD name. Change the CD name if you wish, then click "Next".

7.       The "CD Writing Wizard" starts to write files/folders to the CD:

8.       ·  Once the writing process is complete, the wizard will disappear and the CD-Rom will be ejected.

Monday, November 19, 2012

How to enable malayalam in windows xp


How to enable  malayalam in windows xp  


Now u can use  malayalam in windos xp   by simple  method 


1.Start -                             control panel 

2. In the dialog box   press  LANGUAGES  tab . Then select “ Install  Files for  complex  scripts


3. This method will ask for windows xp cd .Now insert  windows xp cd in drive 

4.The installation is finished  the  windows asks for restart .

5. Again go to 2 nd step

6.Now click details tab .Click on “add” to add the languages of ur choice
 
7. click on the “Advaned “ tab  in the “details” box

8. Deselect the  “ Turn off advanced services “ in the system configration

9. Restart your machine

10. A small “EN “ will appear in the system tray  .Left click on “EN “ and choose the  “MY “ to strat typing        in malayalam 

Wednesday, November 14, 2012

Speed Up Broadband Connection


Speed Up Broadband Connection
                                                                                                                                                                          
You can increase the speed of your broadband internet connection, if you are using Windows XP on your computer. This is built-in feature of windows XP to reserve the 20% of bandwidth of your internet connection, but you can override of this default setting. By enabling these setting, you can use this reserve bandwidth and enjoy your speedy broadband internet connection. You can set reserve able limit from 0 to 100%, but if you want to enjoy 100% bandwidth of internet connection, you should configure bandwidth limit 0%.


Follow the given steps to configure bandwidth limit:

·         First click on Start button then type "GPedit.msc" in Run option and press Enter.


·         Under "Local Computer Policy" expand the "Administrative templates".

·         Here in right side window expand the "Network" then highlight the "QoS Packet Scheduler"

·         Now again in right side window, double click on "Limit reservable bandwidth".

·         under the "Limit reservable bandwidth properties" dialog box check "Enabled" then change the "Bandwidth limit %" to zero.

·         Now close the Group Policy editor and restart your computer, after any changes to go into effect.


Tuesday, November 13, 2012

What is a Virus


What is a virus?
What is a virus is a very important question! A virus is a small program that gets into your computer undetected in order to cause havoc. This small software program has either been developed because the author enjoys causing disasters for other people or sometimes for monetary gains. Sometimes a virus is packaged in a file that is called a trojan virus. It is disguised as something else, and once it has gained access to your computer it then releases its intent.   Also see What’s the difference between a virus, spyware, Malware, and adware?


Vital  Information  Resources  Under  Seizge 


ere are some more technical definitions relating to what is a virus from other websites:


Control all open windows using windows shortcut keys


Control all open windows using windows shortcut keys

A cool tip to minimize and maximize all your active windows programs. You can do all using your mouse, but if you want to do this with keyboard then simply press Windows key+M to minimize all active programs and later maximize it using Windows key+Shift+M.


If you want to minimize the all active windows programs one by one then use the shortcut  by pressing Alt+Space+N keys and sequentially maximize the active windows programs using shortcut  Alt+Space+X keys.

Saturday, November 10, 2012

clear all windows history files with a single click?

How to clear all windows history files with a single click?


Today tip will help you to manage the all types of user history in windows operating system. This is a built-in feature of all windows keeps track the user's history, for example the websites you have visited, the documents you have opened and the keywords or files for which you've searched. However this tip is very useful for you, if you are sharing your computer with others or you do not want that the other persons know about your last visited documents history. You can clear these kinds of user's history with a single click on desktop icon named Cleanmru.reg. There is no need to clear each history file one by one. This trick will work in nearly all of the windows versions like windows 2000, XP and 2003.


Follow the given steps for configuration to clear recently opened documents automatically

To edit the computer registry, first you should log onto your computer with administrative rights.

Here copy the following 6 lines and paste in notepad then save with the name Cleanmru.reg on your desktop.


Here copy the following 6 lines and paste in notepad then save with the name Cleanmru.reg on your desktop.


REGEDIT4

[-HKEY_CURRENT_USER\Software\Microsoft\Internet Explorer\TypedURLs]

[-HKEY_CURRENT_USER\Software\Microsoft\Windows\CurrentVersion\Explorer\RunMRU]

[-HKEY_CURRENT_USER\Software\Microsoft\Windows\CurrentVersion\Explorer\RecentDocs]

[-HKEY_CURRENT_USER\Software\Microsoft\Windows\CurrentVersion\Explorer\ComDlg32\

LastVisitedMRU] 

[-HKEY_CURRENT_USER\Software\Microsoft\Search Assistant\ACMru]


When you double-click Cleanmru.reg icon to remove the windows history, a small dialog box will appear with the information "Are you sure you want to add the information in C:\Documents and Settings\Administrator\desktop\Clearmru.reg to the registry?"


At the end, you will get the message "Information in C:\Documents and Settings\Administrator\desktop\Clearmru.reg has been successfully entered into the registry." Click on Ok button and verify that your all history will have been clear.


Friday, November 9, 2012

How to delete virus without using antivirus program?


 How to delete virus without using antivirus program?

To delete virus without using using antivirus program follow the below steps:

Step 1: Start your command prompt, type cmd then press ok
Step 2: Select the virus affected drive in this case drive j:type j: then press enter key to see the content on the drive j, you can type dir command.
type dir to check whether it contain unusual .exe file
yes! it contains .exe file with autorun.inf


Step 3: Type attrib -s -h *.* /s /d then press enter key
now you can delete these two files or rename these things.
In this case i will rename autorun.inf file into aa .
now you can access the drive j: without affecting the virus.

MntDrCore this is the harmful .exe aa this is the renamed autorun.inf.
now you can delete those two files.

Wednesday, November 7, 2012

EASEUS Data Recovery Wizard Free Edition 5.0.1


EASEUS Data Recovery Wizard Free Edition 5.0.1


New - Free full-functional file recovery software!
Free and powerful deleted file recovery software to recover 1 GB file free of charge. It solves all data loss problems - recover deleted files emptied from Recycle Bin, or lost due to software crash, formatted or damaged hard drive, virus attack, lost partition and other unknown reasons under Windows 2000 / XP / 2003 / Vista / 2008 / 7. It recovers deleted files from formatted partitions with original file names and storage paths. Moreover, the free data recovery software works well with dynamic disk, RAID and Linux EXT2/EXT3 file system.
Advantages over other free file recovery software:
  • Recover deleted files from formatted partitions with original file names and storage paths.
  • Recover deleted files from lost/deleted partitions.
  • Recover deleted files from dynamic disks.
  • Recover deleted files from Linux file system partition under Windows

How to create One-Click Hibernation icon on your desktop?


How to create One-Click Hibernation icon on your desktop?

Today tip will help you to start the quicker hibernation process with a single click on desktop icon. This is the easiest way to start the hibernation process in windows XP. A simple click on hibernation icon, close the all running applications and will start hibernation process properly. This tip is very useful to save energy and time as well. If any case this desktop shortcut does not work, then you should need to configure your computer to enable hibernation. Go on the Start button and select "Settings". Click on "Control Panel" then double-click on the "Power Options" icon. Click on the "Hibernate" tab and make sure the "Enable Hibernate" checkbox is checked.
Follow the given steps to create the shutdown icon:
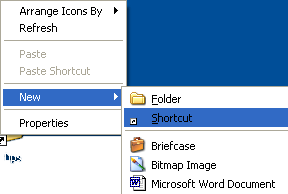
To create a new shortcut, right click on any empty area of your desktop and go to New then Shortcut.

Now a small windows dialog box will appear with the title "Create Windows". In the "Create Shortcut" window, type the following command.


rundll32.exe PowrProf.dll, SetSuspendState