Ever experienced a minor problem in your Windows
computer that has later on developed into a serious one? Most problems that are
memory (RAM) or hard drive related can lead to some dire consequences that
often puts your files at risk. You surely don’t want to lose all of those
important photos that you had in your last family outing or those files that
are crucial to your business or work. That’s the reason why you need to learn
some maintenance and as well as other security steps that would help preserve
your files and as well as your computer settings which took you months or even
years to gather, learn and apply. Starting from scratch with an old computer
really doesn’t feel good enough especially if the thought of losing all your
precious files is still lingering but thankfully, these possible problems can
be prevented with some very useful tool that is built in with the Windows
operating system.
In this tutorial, we will be learning the steps
in how you can use one of the security features in Windows 8.1 which is called
System Recovery but before
going into the details, we will first discuss the different ways in how you can
access it in your computer
Accessing the System Recovery Feature
Using any tool in your Windows 8.1
computer means that you first need to learn how to access it. You might already
know how to get to the System Recovery feature in
Windows Vista and as well as in Windows 7
but everything has changed in Windows 8.1 which is why
you need to learn some ways in accessing this same tool in Microsoft’s
brand new operating system edition. To make everything more complete, we will
first review the steps involved in accessing this tool in Vista
and Windows 7.
The steps involved in getting into the System
Recovery tool on previous editions of Windows are essentially the
same so you don’t need to be confused about it. The screenshots that are shown
below are taken on a Windows 7 computer but you can
also follow it even in a computer running on Windows Vista.
To start, you will need to click on the Start Button or
press on the Windows key in order to access the Start
Menu.
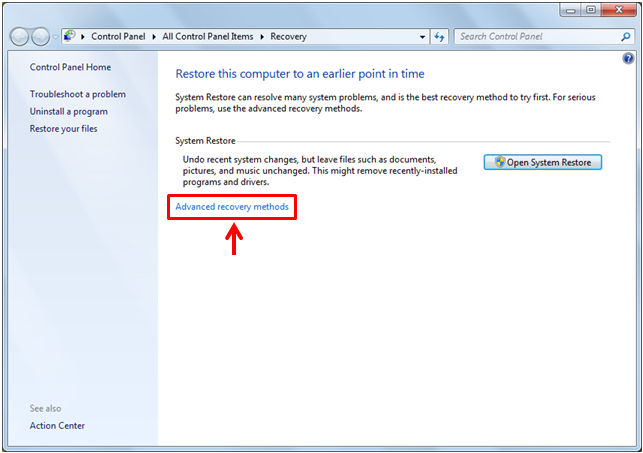
Once the Start Menu opens, just enter the word “recovery”
into the search input box that is located at the bottom and wait for a
few seconds until the search results appears on top. From the search
results, simply look for the one that says “Recovery” and wait until a Control Panel Window
opens showing you options for restoring your computer to a previous
working state. From here, just click on the link located at the bottom
which says “Advanced recovery methods”.
On the Window that follows, you can select between two available methods in restoring your machine. The first one which says “Use system image you created earlier to recover your computer”
is what you should select if you already created a system image to be
used in helping your machine recover from a bad error while the second
option that says “Reinstall Windows (requires Windows installation disk)”
is the one that should be selected in case the first one would not
work. In this option, all your existing files will be deleted but you
can restore them in case you saved a backup copy. Also, you need to take
note that all of the programs and apps that you installed before will
be deleted which means that there will be a need for you to reinstall
them.
Accessing System Recovery in Windows 8.1
If you own a computer that runs in the
latest Windows operating system edition, accessing the same feature in
it is quite different but is a lot easier compared to how it is accessed
in previous versions such as Vista and Windows 7. Since the Start Menu is no longer existing in Windows 8.1, you will need to access the Start Screen by pressing the Windows key or clicking on the Start Button. Once this screen opens, just press Windows + S in your keyboard and the Search screen will appear from the right edge. From here, simply enter the word “recovery” into the search input box that is located at the top.
After doing so, just wait for a few seconds and the search results will
start appearing below the input box. From here, simply look for the
result that says “Create a recovery drive” so you can access the Recovery Drive wizard which will guide you through all the steps that are involved.
NOTE:
Before starting the wizard, be sure that
you have inserted a USB flashdrive where the files will be saved in. You
will need to use a memory stick that has at least 2GB of memory
capacity and it also needs to be cleared of its contents before you use
it.
Moving on, when the wizard opens, you
will now be prompted to attach the flashdrive where you want to copy the
recovery drive files. Before attaching the drive to your machine, be
sure that you have properly prepared it by deleting its contents and if
possible, be sure to scan it against any virus or other malware (which
will not be needed if the storage device is newly purchased). After
connecting the drive, simply click the “Next” button on the wizard.
The Wizard will then show a progress bar while it is trying to detect
the memory stick or flashdrive that you have attached to your computer.
This process will just take a few seconds and once it is completed, you
will be able to see your flashdrive listed at the bottom portion of the
wizard Window.
he name of your device will be the same
as the name that the manufacturer gave it or if you already changed it
into a custom name then you will see it under the “Available drive(s)” section as you can see on the screenshot shown above. From here, simply select the drive and hit the “Next” button at the bottom.
NOTE:
If you did not clear/delete the contents
of the flashdrive that you want to use, the wizard will automatically
delete them once you start the process of copying recovery drive files.
We therefore advice that you secure any important file that is stored in
the flashdrive by copying them into a separate computer or storage
device to avoid them from being lost.
Now, on the next Window, you will be able
to read a warning message that tells you to save any important file
that is saved in the flashdrive that you want to use since they will all
be deleted in the process. If you’re already able to save them in a
separate storage device, you can click on the “Create” button that is located at the bottom of the Window.
The Window that follows will then show a progress bar showing the
overall progress of the recovery drive creating process. Just wait until
the whole bar turns green (which means that the process is completed)
and the wizard will automatically take you to the next Window which
contains a message that says “The recovery drive is ready” and from here, all you need to do is click on the button at the bottom that says “Finish”.
Lastly, you can now remove the USB flashdrive and use it whenever the
need arises. Your recovery drive is capable of being used when your
computer runs into a trouble that is not possible to be reversed. It is a
better way of fixing a problem and you should try to use it first
before attempting to reinstall Windows on your computer which will
delete everything in it and would make you start from scratch


