Pages

Friday, March 18, 2016

How to use and start a Conversation using Firefox Hello

Firefox browser is a popular browser for Windows. There are many other features that enhance the productivity of the browser. For instance, there’s a new feature called Firefox Hello that lets users make free video and voice calls directly from the browser. All a user needs is a webcam (optional), a microphone, and the latest version of Firefox, to call friends who are on WebRTC (a technology project that lets you communicate instantly using only your browser – no other software needed!) supported browsers like Firefox, Chrome or Opera.


Start a Conversation using Firefox Hello


Hello is a cross-platform video chat service. The highlight of the service is it’s free to make voice and video calls and there’s no requirement for software download, plugins or even create an account. It’s ready for use as soon as you open Firefox by clicking on the ‘chat bubble’ icon under the customize menu.


Firefox Hello chat review & feature use

Click on the Hello button hello button. Click Start a conversation.


Give your conversation a name by typing it in the Name this conversation field. Click,

    Email Link to send the link to a friend using your default email application, or
    Click Copy Link and paste the link into another messaging application.


When your friend joins the conversation, the Hello button will turn blue with an accompanying alert (Hello requires access to your Microphone and camera). The blue dot on your list will also let you know which conversation is active.


You can start your conversation. Once finished, click Hang Up to end the call.


Please note that the conversation stays on your list for future use. You can delete it by clicking the Delete icon next to the conversation


Also, for some reason if you’re not ready to receive a call, you can control your conversation. Click on the status menu at the bottom of the window and set it to Do Not Disturb to stop all call notifications.


That s it 


Friday, January 22, 2016

Use Windows 7 Back up and Restore Tool in Windows 10


Microsoft introduced a robust Backup and Restore Tool in Windows 7, that let users create backups of their User files as well as System Images. The procedure to Backup and Restore files in Windows 10 changed, but you can still use the Windows 7 Back up and Restore Tool in Windows 10. This tool also lets you create back ups on to a separate drive on your computer. Lets us see how to create backups of your User files as well as System Images using this tool in Windows 10.


10 Windows 7 Back up and Restore Tool in Windows


Open Control Panel and click open the Backup and Restore (Windows 7) applet. Click on the Set up backup link to commence.


You will be asked where you want to save your backup. You may select another drive, and external hard drive or a network drive. In this example I have selected my D Drive.


Clicking on Next will open up a window, where you will be asked what you would like to back up. You may select Let Windows decide or you may select Let me choose


Clicking on Let me choose will allow you to select the folders you want to back up and whether you want to include a System Image too. These will be backed up as per a regular schedule – which you can of course change.


Select the items you want to back up and click on Next.
Review your settings and click on the Save settings and run backup button.


The backup will commence.


The backup process is expected to take a while the first time you run it, and may make your computer a bit sluggish.


Just below the Backup settings, you will see a Restore section. Using this, you will be able to Restore your files. You may restore all user’s files or you may select another backup to restore files from.v

Thursday, December 31, 2015

Block or Allow Third-Party Cookies in IE

Third-Party Cookies are nothing but Cookies from another website requested via an embedded code. These have no real benefit to the user as they are only used for data gathering purposes.

Some websites or features on a web page may not work if you block third-party cookies. Then again, some of you may have privacy concerns and may want to block third-party cookies.


We have seen how you can manage cookies in Internet Explorer, Chrome, Firefox and Opera. Now let us see how you can allow or block third-party cookies in these web browsers.
Block Third-Party Cookies in Internet Explorer

To set Internet Explorer to block third-party cookies, open IE > Internet Options > Privacy tab


Click on the Advanced button to open the Advanced Privacy Settings. here, check the Override automatic cookie handling box. IE by default accepts third-party cookies. To block them, select Block. Click OK and exit.

Saturday, December 5, 2015

Use VLC Media player As A Screen Recording Tool


VLC player is touted as the Swiss Army Knife of all media players, and not without reason. While it practically plays every media file that you throw at it, what’s amazing about VLC is that it does so much more beyond that.

One of VLC’s potential use-cases can be using it as a screen capture/recording tool. Sure, there are other free apps out there that are better equipped for this particular task, but there might be situations when you need to do some quick screen recording, and don’t have a recorder app to work with.

Screen capturing with VLC is fairly simple, and requires just a few steps –

    Open VLC player, and click on View –> Advanced Controls. A few more buttons will appear on the interface.
    Now, press Ctrl + C (or, go to Media –> Open Capture Device…).

    In the new window, set Capture Device to “Desktop”, and the Desired frame rate to “10 fps” (frames per second). You can set a higher value if you want, but 10-12 fps will make just fine screencasts.


Click on the Play button, and VLC will start showing your desktop. Make sure VLC isn’t maximized, else all you’ll see is an endless stream of VLC-inside-VLC windows!

 Click on the Record button to start recording. You should preferably minimize the VLC window so that it doesn’t show up in your screencast


    Do whatever you need to show in your screencast, then restore the VLC window and click on the Record button again to stop recording.

    VLC will automatically save an AVI file in your Videos folder, which you can then share or do whatever you want with it.


Before you get all excited about this VLC feature, here are some pretty serious limitations you should keep in mind.


    There is no way to use your voice in your screencast. You’ll have to record your voice separately and stream that audio file along with the desktop recording. Clicking on the recording button will then save the audio along with the screencast.


You can only record your entire desktop in RAW format. There is no way to record a part of the desktop. This leads to enormous sized videos (like in GBs!) even for relatively short screencasts. For smaller videos, you’ll have to compress your video using H.264 or WebM.

As I said before, VLC shouldn’t be your go-to screen recording app, but it is certainly a useful feature to have nevertheless.


Sunday, November 22, 2015

How to show File Extensions in Windows 8 / 7

File Extension is that which identifies the file type. If you are a regular Windows user, then it is not at all a problem to identify the file type. For it is very important to see file extension to identity the type of file you are trying to open from a security point of view. So in this post, we will see how to show File Extensions and why you should.


Since file names allow you to use multiple full stops, the real name of a malware file could be realword.docx.exe. But because you have not set Windows to show file extensions, you would see only realword.docx. Thinking its a Word document, you could well end up clicking on it and infecting your computer. If you had, on the other hand, set your PC to show file extensions, you would see its ful name – realword.docx.exe, which would help you to identify that it was actually an executable file and in all probability a malware file.


What are File Extensions and how are they useful


Different file types have different extensions. Audio files have .mp3, .wav, .wma and more based on the program used to open that file. File extensions also help the operating system to identify the corresponding program to open that particular file. So, you should be able to see file extensions to be at safer side and we will let you know how to enable options to see file extensions in Windows 


As mentioned earlier, by default Windows does not show files extensions and they are hidden. But, you can toggle the option to see them.
-


Show File Extensions
There are two ways how you can go about accessing this setting. One way is through the Control Panel and other way is through Windows Explorer itself. In both ways, you will be toggling the option to see file extensions.


Through Control Panel
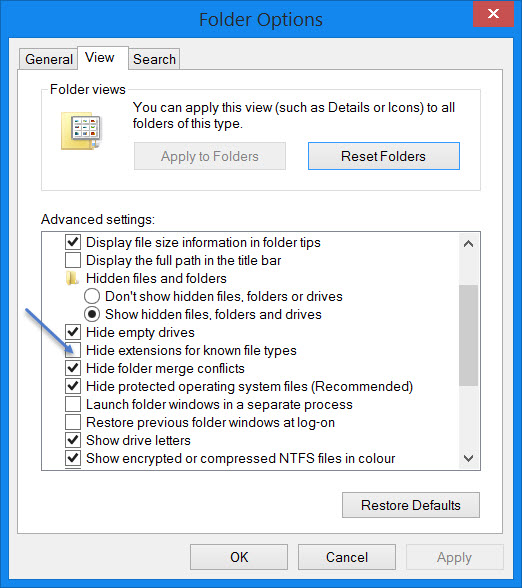
Open Control Panel > Appearance and Personalization.  Now, click on Folder Options > View tab. In this tab, under Advance Settings, you will see the option Hide extensions for known file types. Uncheck this option and click on Apply and OK.


Now, you can see file extensions for all files anywhere on your Windows system.


These are very simple steps to follow and you do not need any third party softwares to view file extensions. Windows provides us everything which can be easily achieved and the point lies in knowing and implementing them. This is the first way to see file extensions in Windows 7.

Via Windows File Explorer

In Windows 8.1 explorer, you can access it via View > Options > Change folder and search options. In Windows 7, open Explorer, press Alt on your keyboard to make the Classic bar appear. Next, click on Tools > Folder Options. Now follow the steps mentioned above.

Thus, you can set your Windows to show file extensions in Windows 8. If you have anything to add, please do share with us through comments.


Open Control Panel > Appearance and Personalization.  Now, click on Folder Options > View tab. In this tab, under Advance Settings, you will see the option Hide extensions for known file types. Uncheck this option and click on Apply and OK.


Monday, September 28, 2015

How to edit PDF files in Word 2013


Portable Document Format (PDF) is a common format for sharing final versions of files. The format is most used for viewing and not editing. But if you need to edit PDF files, Microsoft Word 2013 brings a multitude of features to the word-processing table, one being the capability to edit PDFs.


Office 2010 provided the option to save a document as PDF, but Microsoft Word 2013 even allows editing of the content before sending it to the final recipient, as a PDF file. Although, full version of Adobe Acrobat allows users to modify PDFs, it’s more cumbersome than editing the original document in MS Office. Why so? PDF is technically an image file, converting this image file back to text needs sophisticated OCR like Adobe Acrobat X Pro or other tools. Adobe Free Reader therefore, does not allow you to modify the content in a PDF. With Word 2013, however, you can convert a PDF into a Word document and edit the content.

In this post, we will see how to edit PDF files in Word 2013


Edit PDF Files in Word

When you install Office 2013, you will notice that the context menu for any PDF file, has an option to open a PDF file in Microsoft Word, along with your other PDF Readers like Adobe Reader or Foxit and Windows Reader, if you are on Windows 8.

Go to any PDF file location, right-click on the PDF file, select ‘Open with’ option and choose ‘Word (desktop) to open it in Word 2013. When you open any PDF file in Word 2013,  it starts to convert it using Microsoft PDF Reflow.

Microsoft PDF Reflow, will convert all the files contents, including its formatting like paragraphs, lists, headers, columns, footnotes , tables, etc, into Word content. You will be able to edit even the tables. I tried with various smaller PDF documents and it kept all its formatting, even after the conversion. Then I also tried bigger-sized PDF’s like e-books (sized ~30MB) . It took a bit of time to convert – but it did its job. So, you can try large files too if you have some newer systems with more memory.


Anyway, next, a dialog box with a message “Word will convert your PDF to an editable Word document. The resulting Word document will be optimized to allow you edit the text, so it might not look exactly like the original PDF, especially if the original file contained lots of graphics.” should appear on your computer screen.

Click the OK button to continue opening the file in Word 2013. Once it opens the PDF in Word, it will be in Read Only / Protected mode
Upon opening the file, Click the Enable Editing button next to the warning message to begin editing your PDF file. Once the editing is completed, click File, click Save as button to save the file. Here, remember, you cannot save the changes to the existing PDF file readily.
To maintain your changes, it is essential you  save the document with a new name or to a different location.


So, if you get a pop bearing the same message do not be surprised. Try saving the PDF with a different name or save the file in Word or PDF format.


Depending on the situation, one option may work better than the other:

PDF: If you don’t want to make any more changes to the document, save the edited document as a PDF file.

Word document: If you want to continue making changes to the document (or if you need second pair of eyes for approving the changes), save it as a Word document. You can always save it as a PDF file later on.

This is a great feature in Word 2013, among many other cool features of Microsoft Office 2013!


Sunday, September 20, 2015

Enable or Disable 3rd-party cookies in IE app on Windows 8.1

Earlier we explained you about an Internet Cookie and the different types of Internet Cookies. We also detailed the steps that need to be followed in order to block or allow Third-Party Cookies in IE, Chrome, Firefox, Opera. In this post, we will see how to enable or disable 3rd-party cookies in the Internet Explorer App for Windows 8.1, using Charms PC Settings Panel.

Before starting with the tip, let’s take a glimpse of what a third-party cookie is. Third-party cookies are the small amount of text stored in your web browser by a website with a domain name, other than the one you are currently visiting. Most of the time, the ad services use cookies to offer you the targeted ads based on your browsing history and web searches. However, they can raise privacy concerns and some may want to block them for privacy reasons.

Let us see how you can enable or disable third-party cookies in the IE app, using the Charms Settings panel.

Disable 3rd-party cookies in IE app

If you prefer to use the IE app, then to block or disable the third-party cookies in the Internet explorer app, you have to follow the below mentioned steps.

1.       1. Open your Metro or Modern or Universal IE app and then bring up the Charms bar. Choose Settings.

2.     2.   In the Settings charm, select the Privacy tab.


3.      3  In Privacy, scroll down to get the Cookies Section and set the Block all third-party cookies switch to ON.


 4.       The Internet Explorer app has now blocked the third-party cookies.


5.      NOTE: If you are using Windows 8  or later, you have both desktop and the app version of Internet Explorer installed on your device. Though, the IE for desktop and IE app look and work differently, they share the same settings. Therefore, if you have disabled third-party cookies in the desktop variant of the browser then you don’t have to repeat the process for the Internet Explorer App.