Pages

Friday, December 19, 2014

How to Shutdown Your Computer At a Specific Time

When you are facing the power cut or when you are listening to music from your PC and fall asleep ,but most of the  time you don’t want your computer to be on all the time during your sleep, you only want it be on for first few hours.


 some people download torrents or you are downloading a big file from the internet and because your net connection is not that fast in whole night and they wont shut down the computer till the morning.  So that computer’s power supply will be interrupted causing some damage to Hard disk drive.It will cause absolute waste of the electricity. So here you need a automated way to shutdown your computer.


 To avoid the a huge energy drain, You create a task to shutdown  your computer, triggered after a certain time and give your PC some rest.. this method works perfectly for Windows (XP, Vista, 7 or 8). Follow the instructions below depending on what you want to do.


Auto shut down your computer at a specified time


·         First right-click on the desktop and create a new shortcut
·         There a new window will open. In this window you have to specify the command and period.   or  Press Windows Key + R. or  Enter CMD and press Enter.This will start the command prompt.
·         We need to calculate after how long we want computer to be shutdown. We have to put specific amount of time in seconds like if you want your PC to turn off after 3 hours then it will go like this. 3  hours are 180 minutes so 180 * 60 = 10800 seconds.
·         the command format should be like this.
                                                                             

               shutdown -s -t XXXX.
                For example Copy and paste

                               “shutdown.exe -s -t 10800″
                Just put your time in second instead of XXXX.


 (Type “shutdown -s” without the quotes in the command prompt and press Enter. Shutdown is the command being executed and the switch -s tells the computer to shutdown)

 So, write it in the writing box and click next.

·         Click next and write short cut name “Schedule shutdown”
·         Click “Finish”
·         You can change the icon by right clicking=>properties=>change icon=>browse.


Then, if you double-click the program, your computer will be automatically shut down after the certain period.


Uncertainly  you have work and you don’t need to use the time scheduler.  You want to abort preciously scheduled shutdown. Then there is a simple way to cancel the scheduled timer. Now let me explain how to make an abort button for shutdown scheduling.


·         Right click on your desktop and select New > Shortcut. 
·         Copy and paste “shutdown.exe -a” (copy without quotes) in the only text field available in new shortcut window.
·         Click next and write short cut name “Abort scheduled shutdown”
·         Click “Finish” now you have abort scheduled shutdown button
·         Well readers you are done. With “Schedule shutdown” button you’ll start the shutdown countdown and with “Abort scheduled shutdown” your computer will remain on and won’t auto shutdown.


By   this way, you can automatically shut down your PC after a certain time. However, if you need to let your computer along for a long time, you can specify the timer to shut down your PC. In this way, you can save the electricity and avoid  damage to Hard disk drive.


Tuesday, December 16, 2014

Block YouTube Ads With a Simple Browser Command


While there are several ways to block YouTube ads here’s why you shouldn’t use them and instead use this simple browser command which blocks all YouTube ads just like other add-ons or extensions! This simple command can block the video ads which play inside videos as well and you don’t have to use an additional plugin or extension or add-on! No installations whatsoever!


You just need to copy-paste a simple command in your browser’s developer console and you are good to go. You’ll never see an advertisement again while browsing your favorite YouTube videos
.


Out of the several experiments being conducted by Google at TestTube, one less known experiment can successfully hide all ads on YouTube with a simple browser command. Here’s how to use it:

  1. Open any YouTube video. Any video works but try with a video where you can see some ads.
  2. Open the developer console. You can right-click -> Click on Inspect Element -> Choose Console. Or simply press Ctrl-Shift-J for Google Chrome and Ctrl-Shift-K for Mozilla Firefox and in Internet Explorer, press F12 and select Console.
  3. Paste the following code

document.cookie="VISITOR_INFO1_LIVE=oKckVSqvaGw;
path=/; domain=.youtube.com";window.location.reload();


If you wish to see the advertisements again simply follow the first two steps and paste this code instead.


document.cookie="VISITOR_INFO1_LIVE=; path=/; domain=.youtube.com";window.location.reload();


 And the ads are gone. Well since this a temporary workaround and not a permanent solution we really can’t predict when it’ll stop working. But for now since it’s working let’s use it and forget what’s to come in future! Enjoy an ad-free experience without any plugins!


Thursday, December 11, 2014

Last shutdown time of your computer and Last access time of folders,files

Well If your computer is shared or used by more than 1 people and if you want to know that whether in your absence someone has access your pc or not?


Well for windows 7 and windows vista operating system,here are the 

Steps

(1) Goto Run-> type compmgmt.msc and enter.


Or Right Click on my computer,Select Manage.


(2)Now navigate to Event viewer-->Windows Logs-->System.


Now You will be able to see when your computer will be accessed last time.


Now if you want to see when your computer last shutted down, just click on filter current log available in right sidebar.Enter 6006 as event id as shown in screenshot and then press ok.1st row will suggest you that when  you have last shutted down your computer.


You can also able to see when your files or folders accessed last time.This way you can easily trace that if someone else has accessed your personal documents in your absence.

here are the steps,

(1)Download the search tool Everything: http://www.voidtools.com/

(2)Install it and run it, and wait for it to index your disk (should take less than a minute)

(3)Right-click on the column headers (where it says "date modified"), and enable "Last accessed"

(4)Now search for something random, like windows
Click on the new column header "Last accessed" to sort search results, so that latest are on top

(5)Delete your old search, and search for *.c.So that you can be able to 
see the accessed time of all the files having extension .c.Search *.* 

instead and you will see all the files listed with last accessed, with dates and times.

Sunday, November 30, 2014

Display a Text Message During Bootup of Windows 7


Sometimes you might want to leave a text message for a user before they log into a Windows 7 computer. Today we show you a neat trick that allows you to leave a message they can read before logging in.


Add a Text Message

To add a message, click on Start and enter regedit into the Search box and hit Enter.


Navigate to HKEY_LOCAL_MACHINE\Software\Microsoft\Windows\Current Version\Policies\System and double-click on legalnoticecaption


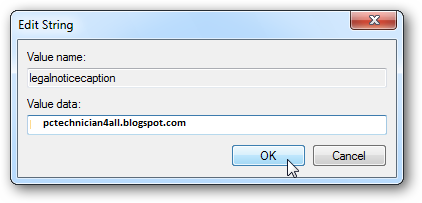
In the Value data field enter in the header you want…for instance your company name or the name of your computer…whatever you want it to be, then click OK.


Then double-click on legalnoticetext


And in the Value data field enter in the message you want to display and click OK. Close out of Registry Editor and reboot the computer.


After the machine reboots you’ll see the text message you just created at the Welcome screen.


You can include whatever text message you want to be included for the user to read before they log in.


This is a neat trick if you have a company or school and want to show a particular message to the user before they log into the machine

Saturday, November 29, 2014

Writing DVD on Windows 7 without Nero


you can also burn data to CD without Nero also here the process is not as complicated compared to Nero,Follow the steps to burn data to CD:


 First insert a blank disc on your CD/DVD drive. An AutoPlay window will open so choose burn files   to disc 


Another prompt will appear and this time asking you to choose between the two options of burning.  The default is the “mastered” option which lets you burn files traditionally – the burned files are read only files so you will not be able to edit or remove them after burning.


The other option is the “live file system” where you can save files like on a USB flash drive – it means you can save, edit and delete files on the disc anytime.  The disadvantage is that it is not compatible with players outside XP, Vista and Windows 7.   so if you want to burn a disc that you want your XBOX 360 to recognize, burn it using the default mastered option.


In this window, enter the title of the disc then click next.  You should see your drive on Explorer with a label that says “drag files to folder…”


Using Windows 7’s side by side snap view position the window above to the left side and another window to the right side.  This way you can see the files being added up as you drag files from the right Explorer window to the left


Click the “burn to disc button”


You may edit the title of the disc or adjust the recording speed.  By default it will choose the recording speed supported by your disc.  Click the next button to begin the burning process.


The progress bar will show you how much time is needed for the burning process.


That’s it.  The good thing about this built in capability is that you won’t have to install third party software just to do basic media burning tasks.  I just wish it has that Nero or Roxio-like interface where you can see how much disc space your files are occupying.  There is a workaround though, you can still right click the selected files and see the size occupied by the files but it doesn’t tell you exactly how much space is still left with the disc.


Friday, November 28, 2014

WiFi Configuration and Security Settings of D Link DSL 2730 U WiFi Modem


We have already published an article on the  Configuration of D Link 2730 U WiFi Modem for BSNL and MTNL broadband  connection. Now here the WiFi configuration and security settings of this Modem. You can very easily configure the WiFi with associated security features through the web interface. Remember – You have to configure the Modem in PPPoE Mode (Always ON mode) to get Simultaneous internet connectivity in all your PCs Laptops and other Smart phones


Connect the Modem with the Ethernet cable to your PC/Laptop and power ON it. Open your browser and type  http://192.168.1.1 . Now Enter “admin”  in  username and password fields to enter the Modem configuration page. In the page Click the Wireless Menu. Select Enable Wireless.  In the SSID field you can type anything to identify your network- The default SSID is “DLink”. You can change it to your Name or something like that. Select your country. Then Click the Save button.


Now go to the Security Menu


In this page you can Enable and configure the WiFi Security. Let the WPS in Disabled Mode. Select your SSID. Set the Network Authentication – WPA-Personal –Auto.
in WPA/WAPI Passphrase field enter a non guessable complex strong password- This is the password of your Wireless network. You have to enter the same in your WiFi Devices for getting connectivity. Select the WPA/WAPI Encryption TKIP+AES or AES. Apply/Save your settings.

MAC Filter (Optional for added security)


MAC filter is an added security feature to safeguard your WiFi network from unauthorized intrusion.
MAC (Media Access Control) address is a unique number of each network hardware. This is actually the id of a machine . There will not be two network cards (Any type) with a same MAC address. It is a manufacture set hard coded one.
Through the MAC filtering, you can optionally allow or deny a specific WiFi device in your network. You need to enter the MAC address of the client machines in the Modem to permit or deny a specific machine. For instance– You have four laptops in a network and you want to enable MAC filtering. For this the MAC address of each machines to be typed in in the Modem for connectivity, means you have to save the addresses of all four machines in your Modem.


How to find MAC address

For Windows PC go to start > Run ant type cmd

Then type ipconfig/all and you will get some values as displayed.

Note down the physical address of WiFi adaptor – This is your MAC address.


Save your Settings and Reboot The Modem.
Now You can connect the Modem through the WiFi adaptors of your Laptop, PC or Smart Phones. While connecting it will ask the password which you have entered in the Modem.


Creating a Recovery Drive in Your Windows 8.1 Machine


Ever experienced a minor problem in your Windows computer that has later on developed into a serious one? Most problems that are memory (RAM) or hard drive related can lead to some dire consequences that often puts your files at risk. You surely don’t want to lose all of those important photos that you had in your last family outing or those files that are crucial to your business or work. That’s the reason why you need to learn some maintenance and as well as other security steps that would help preserve your files and as well as your computer settings which took you months or even years to gather, learn and apply. Starting from scratch with an old computer really doesn’t feel good enough especially if the thought of losing all your precious files is still lingering but thankfully, these possible problems can be prevented with some very useful tool that is built in with the Windows operating system.


In this tutorial, we will be learning the steps in how you can use one of the security features in Windows 8.1 which is called System Recovery but before going into the details, we will first discuss the different ways in how you can access it in your computer


Accessing the System Recovery Feature


Using any tool in your Windows 8.1 computer means that you first need to learn how to access it. You might already know how to get to the System Recovery feature in Windows Vista and as well as in Windows 7 but everything has changed in Windows 8.1 which is why you need to learn some ways in accessing this same tool in Microsoft’s brand new operating system edition. To make everything more complete, we will first review the steps involved in accessing this tool in Vista and Windows 7.


The steps involved in getting into the System Recovery tool on previous editions of Windows are essentially the same so you don’t need to be confused about it. The screenshots that are shown below are taken on a Windows 7 computer but you can also follow it even in a computer running on Windows Vista. To start, you will need to click on the Start Button or press on the Windows key in order to access the Start Menu.


Once the Start Menu opens, just enter the word “recovery” into the search input box that is located at the bottom and wait for a few seconds until the search results appears on top. From the search results, simply look for the one that says “Recovery” and wait until a Control Panel Window opens showing you options for restoring your computer to a previous working state. From here, just click on the link located at the bottom which says “Advanced recovery methods”.
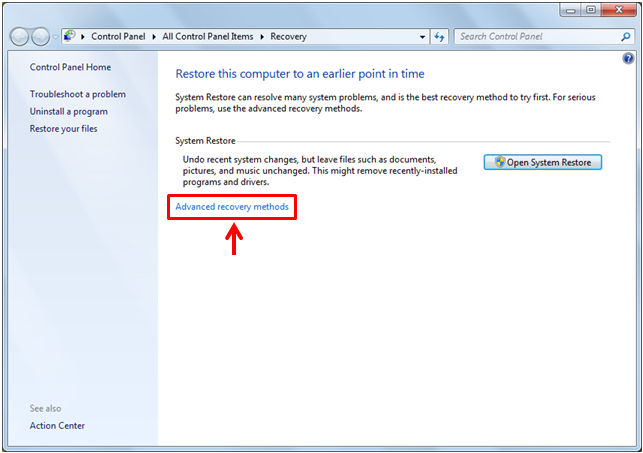

On the Window that follows, you can select between two available methods in restoring your machine. The first one which says “Use system image you created earlier to recover your computer” is what you should select if you already created a system image to be used in helping your machine recover from a bad error while the second option that says “Reinstall Windows (requires Windows installation disk)” is the one that should be selected in case the first one would not work. In this option, all your existing files will be deleted but you can restore them in case you saved a backup copy. Also, you need to take note that all of the programs and apps that you installed before will be deleted which means that there will be a need for you to reinstall them.


Accessing System Recovery in Windows 8.1

If you own a computer that runs in the latest Windows operating system edition, accessing the same feature in it is quite different but is a lot easier compared to how it is accessed in previous versions such as Vista and Windows 7. Since the Start Menu is no longer existing in Windows 8.1, you will need to access the Start Screen by pressing the Windows key or clicking on the Start Button. Once this screen opens, just press Windows + S in your keyboard and the Search screen will appear from the right edge. From here, simply enter the word “recovery” into the search input box that is located at the top.


After doing so, just wait for a few seconds and the search results will start appearing below the input box. From here, simply look for the result that says “Create a recovery drive” so you can access the Recovery Drive wizard which will guide you through all the steps that are involved.


NOTE:

Before starting the wizard, be sure that you have inserted a USB flashdrive where the files will be saved in. You will need to use a memory stick that has at least 2GB of memory capacity and it also needs to be cleared of its contents before you use it.
Moving on, when the wizard opens, you will now be prompted to attach the flashdrive where you want to copy the recovery drive files. Before attaching the drive to your machine, be sure that you have properly prepared it by deleting its contents and if possible, be sure to scan it against any virus or other malware (which will not be needed if the storage device is newly purchased). After connecting the drive, simply click the “Next” button on the wizard.


The Wizard will then show a progress bar while it is trying to detect the memory stick or flashdrive that you have attached to your computer. This process will just take a few seconds and once it is completed, you will be able to see your flashdrive listed at the bottom portion of the wizard Window.


he name of your device will be the same as the name that the manufacturer gave it or if you already changed it into a custom name then you will see it under the “Available drive(s)” section as you can see on the screenshot shown above. From here, simply select the drive and hit the “Next” button at the bottom.

NOTE:

If you did not clear/delete the contents of the flashdrive that you want to use, the wizard will automatically delete them once you start the process of copying recovery drive files. We therefore advice that you secure any important file that is stored in the flashdrive by copying them into a separate computer or storage device to avoid them from being lost.
Now, on the next Window, you will be able to read a warning message that tells you to save any important file that is saved in the flashdrive that you want to use since they will all be deleted in the process. If you’re already able to save them in a separate storage device, you can click on the “Create” button that is located at the bottom of the Window.


The Window that follows will then show a progress bar showing the overall progress of the recovery drive creating process. Just wait until the whole bar turns green (which means that the process is completed) and the wizard will automatically take you to the next Window which contains a message that says “The recovery drive is ready” and from here, all you need to do is click on the button at the bottom that says “Finish”.


Lastly, you can now remove the USB flashdrive and use it whenever the need arises. Your recovery drive is capable of being used when your computer runs into a trouble that is not possible to be reversed. It is a better way of fixing a problem and you should try to use it first before attempting to reinstall Windows on your computer which will delete everything in it and would make you start from scratch