Pages

Wednesday, July 18, 2018

How to Speed Up Internet Connection In Windows 10


Frequently we are facing slow Internet connection. Then a lot of problems come our faces for slow Internet connectivity. If we want to increase your Internet speed. You can speedup Internet connection without added cost just following this process:


Speedup Internet Connection

1. Go to Start button and write Run in the windows search box, then click run button.

2. Type GPEDIT.MSC and click OK button.


3. Expand Administrative Templates under Computer Configuration.

4. Expand Network under Administrative Templates.

5. Click QoS Packet Scheduler under Network.

6. Double click Limit reservable bandwidth under QoS Packet Scheduler.

7. Open a new window and select Enabled option and set Bandwidth limit to 0% then click OK button.

 this process, you can easily speed up your Internet connection 20%

How to stop Windows 10 update assistant

Windows 10 users are always forced to install the automatic updates whether they are willing to do so or not. Windows 10 restarts the system without saving the current work. Have you ever noticed this problem? Are you among the second group of users? If yes, you must have tried to disable Windows 10 update by the use of Control Panel or the Settings app. We have come with a series of solutions against how to stop windows 10 update assistant. Here we start with the deactivation of the [Automatic Update] feature.


Three ways to stop Windows 10 update assistant

  • Turning off the automatic update

  1. Open [Control Panel]
  2. Navigate the [Windows Update]
  3. Click on [Check for updates but let me choose whether to download or install them]
  4. It will allow you to turn off the [Automatic Update]
  • Deactivating the GWX patches

  1. Open [Control Panel]; navigate [Add or Remove programs]
  2. Make left click on [View installed updates]
  3. Find out the KB 3035583, KB 2952664, and KB 2976978
  4. Uninstall all these files
  • Deleting the installation file

Deleting the installation files is a great option to get rid of the concerned problem. Make right-click on the [File] explorer and choose [Disk Cleanup]. Click on the box marked [Clean up System files] after the Explorer appears. Then you will have to find out the box labeled [Temporary Installation Files] from the appeared list. It will be bigger than 5 GB. A question – are you sure you want to delete permanently? – will appear. Go forward only if you are determined to delete the files. This is how you will get the answer to your question; i.e., how to stop windows 10 update assistant.

Why Windows 10 automatically updates the system?

If you want to recover this issue with the help of technical support team then one can contact to windows customer service phone number to resolve any query regarding windows support to know how to block windows 10 update assistant.

How to Stop Windows 10 Auto-Installing Updates


If you want to prevent Windows 10 from downloading and installing updates automatically, we’ll show you how to do it.

A lot of software these days is updated automatically, including web browsers and the operating system on Google Chromebooks. They’re more services than software, and although Windows has always had fairly regular updates, Windows 10 has been unpopular with users because Microsoft really forced those updates out and restarted PCs even if you were in the middle of something.

Things are better now thanks to a feature called Active hours that lets you set a period of time each when Windows won’t restart. We’ll also explain how to use this.


How to stop Windows 10 automatically installing updates

 
One way to stop updates being downloaded is to set your internet connection as ‘metered’. This is a common thing on phones, where you wouldn’t want app updates eating up all your data allowance. And you can do the same thing in Windows 10.
To do this, open the Windows 10 Settings (the cog icon on the Start menu) and click Network and Internet.

Click on Wi-Fi in the left-hand menu, then click on the network to which your laptop, tablet or PC is connected (sadly, you can’t do this for wired Ethernet connections).

Scroll down and you’ll see the option for Metered connection, and below it the switch to turn it on. 


this will reduce data usage and stop Windows updates from being downloaded.
Naturally, this will also prevent them from being installed, which means it’s a cunning way to defer updates if you have Windows 10 Home, which most home users do.


Windows 10 Professional Edition: Defer upgrades

While Home users are stuck with having to work around automatic updates, Professional users have a built-in option that allows them to defer updates for several months. The best part of this option is that security patches are still applied, it’s just system updates that are held back.


To enable the feature go to the Start Menu and type Settings, then select the top option. From Settings go to Advanced Options and there you’ll find the Defer Upgrades tick box under the Choose How Updates are Installed section. Click on this and you won’t have to worry about updates for a while.


Thursday, February 22, 2018

How to Turn On or Off Fast Startup in Windows 10


The following tutorial will help you to learn how to turn on off fast Startup in Windows 10. Fast Startup is a setting which is set enabled by default in Windows operating system. When Fast Startup is enabled, the computer starts much faster after shutdown. This feature stores all the system information onto a file and when the computer is powered on, the system information is accessed from the cache which makes booting of the computer much faster and smoother. In the Technical preview build 992, I could not find the option to choose Fast Startup from Control Panel but this method is applicable for any version of Windows. One more thing to remind you, if you check the Help and Support section, you’ll find that Fast Startup feature is enabled in default. So this means that the feature has been incorporated in your machine and Windows might introduce the setting in some upcoming builds.


Steps to Turn On or Off Fast Startup in Windows 10

A. 1. Tap on the Power icon in the taskbar and tap on More Power options.


2. Now select Choose what the Power Button does.


3. Click Change Settings that are currently unavailable.


4. Now under Shutdown Settings, you’ll find the option to select Fast Startup (Recommended). Tap on it and save changes. If you want to disable fast Startup, just uncheck the box.


B. Another alternate way is changing the setting through Registry Editor.
1. Open Run window by pressing Windows+R. Now type regedit in space field and hit Enter.


2. Now navigate to the following location HKEY_LOCAL_MACHINE\SYSTEM\CurrentControlSet\Control\Session Manager\Power.


3. In the right pane, find out HiberbootEnabled DWORD.

4. Double click on it to edit the value. Set the value as stated below.
0 = Turn off fast startup
1 = Turn on fast startup

Saturday, November 11, 2017

How To Enable/Disable Autocomplete For File Explorer In Windows 10


File navigation is pretty simple in Windows but if you use File Explorer or the Windows run dialog to open the registry, or the device manager, you have to remember what it’s called. You cannot just type Device Manager in the File Explorer address bar or in the run dialog to open the app. If you have trouble remembering what to type, it’s a good idea to enable autocomplete for File explorer in Windows 10.
Autocomplete for File explorer works the way autocomplete works in any other app or service. You start typing and as you type, autocomplete offers suggestions that you can select. If you want to open device manager, you can type a d and both File Explorer and the run dialog will give you suggestions.

Autocomplete For File Explorer

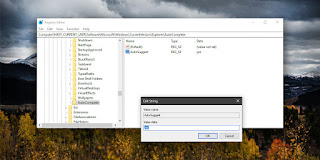
To enable autocomplete for File explorer, you will need administrative rights. Open the Windows Registry and go to the following location. If the AutoComplete key doesn’t exist, create it under the Explorer key. Right-click the Explorer key and select New>Key.
HKEY_CURRENT_USER\SOFTWARE\Microsoft\Windows\CurrentVersion\Explorer\AutoComplete
Inside the AutoComplete key, there should be a value named AutoSuggest. If it isn’t there, you will have to create it. Right-click inside the right pane and selec


When you type in the address bar in File Explorer or inside the run dialog box, Windows will attempt to autocomplete the address for you


If you don’t like the feature, you can turn it off either by setting the value of the Autosuggest string to ‘no’, or by deleting it. We recommend you change the value to ‘no’ instead of deleting it. If the key was never there to begin with, i.e., you had to create it to enable autocomplete in File explorer then deleting it is likely to be harmless. If the key was there before, it’s best for you to leave it there and only change the value.
This is likely to work on older versions of Windows i.e. Windows 7 and 8 but we haven’t tested it out on either one. If the key exists in your registry, then you only need to set its value. For some users, the key not only exists but the value is set to ‘yes’ by default. If you actually find this feature to be annoying, you can disable it. It will neither speed up nor slow down File Explorer. You might also want to compare how autocomplete in File Explorer compares to Windows search.

Saturday, September 17, 2016

Choose Which Icons Appear in System Tray in windows 10


It’s simple to pin specific items to the Taskbar that you want quick access to. In fact, this is one of the handier options because it allows simple access to the apps you use the most often.

However, what about the Notification area (the section at the right side next to the clock)? You can control what shows up there, too. Here’s a look at how to do it.


Choose System Icons in Windows 10

First, go to Settings > Personalization > Taskbar. Then scroll down, and under the Notification area section and select Turn system icons on or off.


Then on the next screen is where you can turn system icons on or off, including Action Center (which some people have no use for).


What is your opinion of removing some of the system icons from the Taskbar? Do you turn some of them off? Leave a comment and tell us your thoughts

How to Manage and Disable AutoPlay in Windows 10


AutoPlay is a Windows feature that Microsoft first introduced way back in Windows 98. AutoPlay detects when removable devices such as DVDs, flash drives, and camera memory cards are connected, and automatically launches a designated program to play or view any compatible content those devices contain. For example, if you insert a DVD movie into your AutoPlay-capable Windows PC, the DVD player app will launch and start playing the movie.


AutoPlay can be a useful feature in that it makes it quicker to access your content with common apps. But it can also become annoying for some users who prefer to access their content manually or with different applications. AutoPlay is enabled by default in Windows 10. If you find the feature to be more annoying than helpful, here’s how to disable it.


Disable AutoPlay

To disable AutoPlay in Windows 10, head to Start > Settings > Devices > AutoPlay.


Users have the option to disable AutoPlay completely by turning it off with the first setting: Use AutoPlay for all media and devices. AutoPlay will be disabled as soon as you toggle the option to the Off setting. There’s no need to reboot or save your change.

Manage AutoPlay Settings

Instead of simply disabling AutoPlay, you can manage how it works for certain devices. To do so, first leave the main AutoPlay toggle described above set to the On position. Next, look at the options under Choose AutoPlay Defaults.

Your own Settings window will look a bit different from the one in our screenshots as each PC is unique. In general, you’ll see an option for
Removable drives,” which covers devices like USB flash drives, and “Memory cards,” which refers to your digital camera’s SD or Compact Flash cards. You’ll also see specific references to certain other devices such as external hard drives or, in the case of our screenshot, mobile devices like the iPhone.


You can click on the drop-down menu beneath each device type to set a default AutoPlay action.  You can also disable AutoPlay for that device by choosing Take no action.
For example, in our screenshots above we’ve disabled AutoPlay for Removable Devices and Memory Cards (“Take no action”), but we’ve configured AutoPlay to launch File Explorer and show our photos each time we connect our iPhone. If you frequently open the same type of content in different applications and would like to be prompted each time a device is connected, choose Ask me every time. Also note that you can trigger the “Ask Me” prompt regardless of default setting by pressing and holding the Shift key on your keyboard while you connect an AutoPlay-compatible device.

Changing Advanced AutoPlay Settings via Control Panel

The AutoPlay options in the Windows 10 Settings app are relatively straightforward. Longtime Windows users, however, may notice that these default options aren’t as granular as those found in previous versions. Thankfully, those old advanced AutoPlay settings are still available in the Control Panel.


Just head to Control Panel > Hardware and Sound > AutoPlay. Here, you’ll be able to choose default AutoPlay actions for all device types, including CDs, Blu-rays, and DVDs.


If you’ve made too many changes and want to revert back to the default AutoPlay settings, scroll to the bottom of the AutoPlay window in Control Panel and click Reset all defaults.